Everest High Passes Trek
The Everest High Passes Trek also widely known as the Everest Three Passes Trek that is the most complete, most demanding, and most rewarding long-distance trek in the entire Khumbu region. It is, in short, the ultimate version of an Everest trek.
Where the classic Everest Base Camp trek follows one trail in and retraces it out, and the Gokyo Lake Trek explores one spectacular side valley, the Three Passes route does both — and then some. The circuit links all the major high valleys of the Khumbu into a single continuous loop, crossing three mountain passes that all sit above 5,300 metres: Kongma La (5,535 m), Cho La (5,420 m), and Renjo La (5,360 m). Along the way it takes in Everest Base Camp, Kala Patthar, the Gokyo Lakes, Gokyo Ri, Tengboche Monastery, and villages rarely visited by anyone outside the trekking community.
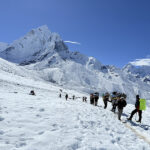
This is not a beginner’s trek. Multiple nights above 5,000 m, glacier crossings, exposed scree and snow on the passes, and 17 to 21 consecutive days of high-altitude hiking all demand real prior experience, serious fitness preparation, and a solid understanding of altitude risk management. But for trekkers who are ready for it, this circuit delivers something no shorter route can: the feeling of having seen the entire Khumbu, in full, from every angle.
Nothing else in Nepal combines all of this in a single journey.
The Three Passes — Know Before You Go
Understanding each pass individually is essential before committing to this trek. They are not interchangeable obstacles. Each has its own character, its own difficulty, and its own rewards.
Kongma La 5,535 m / 18,159 ft
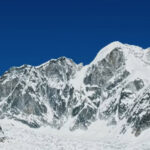
The highest of the three and widely considered the most physically demanding. The ascent from Chhukung is steep, rocky, and relentless — no villages or teahouses en route, so trekkers must carry lunch and water. The descent to Lobuche via the moraine is technical in icy conditions. Views from the top encompass the south face of Lhotse, the Khumbu Glacier, Makalu, and Ama Dablam. Expect 7–9 hours of total walking. Crampons may be needed in winter and early spring.
Cho La 5,420 m / 17,782 ft
The middle pass connects the Lobuche / Everest Base Camp corridor with the Gokyo Valley. The ascent from Dzongla is steep and involves a glacier crossing with potential ice and crevasses near the top. Crampons and ice axe are recommended and sometimes essential, depending on conditions. The descent into Gokyo is steep but shorter. On a clear day the views from the top include Ama Dablam, Cho Oyu, and the Gokyo Lakes laid out below. Typical crossing time: 6–8 hours.
Renjo La 5,360 m / 17,585 ft
The final pass, and the one most experienced trekkers describe as the most scenic. The approach from Lungden is gradual and well-defined compared to the other two. From the summit, you see Everest and the full Khumbu massif directly ahead, the Gokyo Lakes below and behind you, and the Rolwaling range across the western horizon. The descent to Thame through the valley is long but straightforward. Total crossing time: 6–7 hours. Considered the ‘easiest’ of the three, which is relative — it is still a 5,360 m mountain pass.
Trek at a Glance
| Duration | 17–21 Days (19 days is standard; 21 days with Island Peak extension) |
| Maximum Altitude | 5,545 m / 18,192 ft (Kala Patthar) — Kongma La at 5,535 m is the highest pass |
| Trek Start / End | Lukla (2,860 m) — fly from Kathmandu |
| Difficulty | Strenuous / Expert — prior multi-day high-altitude trekking required |
| Daily Walking | 6–9 hours per day; pass days can reach 10 hours |
| Best Seasons | March–May and October–November only |
| Total Distance | Approximately 150–170 km circuit |
| Accommodation | Teahouses throughout; basic above Namche and Dingboche |
| Permits Required | Sagarmatha National Park + Khumbu Pasang Lhamu + TIMS Card |
| Cost (approximate) | USD $1,500–$3,500 depending on group size and operator |
| Crampons / Ice Axe | Strongly recommended for Cho La; essential in winter / early spring |
| Not suitable for | First-time trekkers, anyone without prior high-altitude experience |
Day-by-Day Itinerary (Standard 19-Day Anticlockwise Route)
The anticlockwise direction — crossing Kongma La first, then Cho La, then Renjo La — is the most popular and generally considered the better acclimatisation sequence. It moves through EBC early, then transitions to Gokyo before the final Renjo La crossing. Highlighted rows are pass-crossing days.
| Day | Route | Altitude | Walking Time |
| Day 1 | Kathmandu — Arrive, trip briefing | 1,400 m | — |
| Day 2 | Fly Kathmandu → Lukla → trek to Phakding | 2,610 m | 3–4 hrs |
| Day 3 | Phakding → Namche Bazaar | 3,440 m | 5–6 hrs |
| Day 4 | Acclimatisation — Namche Bazaar (hike to Everest View Hotel) | 3,880 m hike | 3–4 hrs |
| Day 5 | Namche Bazaar → Tengboche | 3,860 m | 5–6 hrs |
| Day 6 | Tengboche → Dingboche | 4,410 m | 5–6 hrs |
| Day 7 | Acclimatisation — Dingboche (hike to Chhukung Ri 5,546 m) | 5,546 m hike | 5–6 hrs |
| Day 8 | Dingboche → Chhukung | 4,730 m | 3–4 hrs |
| Day 9 | Chhukung → Lobuche via Kongma La Pass (5,535 m) | 4,940 m overnight | 8–10 hrs |
| Day 10 | Lobuche → Gorak Shep → Everest Base Camp → Lobuche | 5,364 m EBC | 7–8 hrs |
| Day 11 | Gorak Shep — Kala Patthar (5,545 m) → Dzongla | 4,830 m overnight | 6–7 hrs |
| Day 12 | Dzongla → Gokyo via Cho La Pass (5,420 m) | 4,790 m overnight | 7–9 hrs |
| Day 13 | Acclimatisation — Gokyo (explore lakes, rest) | 4,790 m | Optional 2–4 hrs |
| Day 14 | Gokyo Ri summit (5,357 m) — panoramic views | 5,357 m summit | 5–6 hrs |
| Day 15 | Gokyo → Lungden via Renjo La Pass (5,360 m) | 4,368 m overnight | 7–8 hrs |
| Day 16 | Lungden → Thame | 3,820 m | 4–5 hrs |
| Day 17 | Thame → Namche Bazaar | 3,440 m | 4–5 hrs |
| Day 18 | Namche Bazaar → Lukla | 2,860 m | 6–7 hrs |
| Day 19 | Fly Lukla → Kathmandu | 1,400 m | ~35 min flight |
Stage-by-Stage Breakdown
Days 1–4: Kathmandu to Namche Bazaar — The Approach
Day one is an orientation day in Kathmandu: permit collection, gear check, guide briefing, and preparation. Most trekking operators include a Kathmandu Valley sightseeing option on this day if time allows. Day two begins with the flight to Lukla — a 35-minute mountain flight that lands on one of the world’s most discussed runways — followed by the descent through pine forest to Phakding on the Dudh Koshi River.
Day three is the major early push: Phakding to Namche Bazaar. The trail crosses the Hillary Bridge and several other suspension bridges above the gorge, enters Sagarmatha National Park at Monjo, and climbs 600 metres in the final stretch to Namche at 3,440 m. Near the ridgeline before Namche, on a clear day, Everest appears between the peaks for the first time — a moment most trekkers remember clearly, however many times they’ve seen photographs.
Day four is a full acclimatisation day in Namche. The recommended hike is to Hotel Everest View at 3,880 m (Guinness-record altitude hotel), with views across the Khumbu massif. The Sagarmatha National Park Visitor Centre here has excellent background on the region’s geology, ecology, and cultural history — worth an hour before or after the hike.
Days 5–8: Namche to Chhukung — The High Valley Approach
Day five leaves Namche on the classic EBC route, climbing through juniper and rhododendron forest to Tengboche at 3,860 m, home of the largest monastery in the Khumbu. Founded in 1916 and rebuilt after earthquake damage and fire, Tengboche Monastery sits against the most dramatic peak backdrop in the region — Everest, Lhotse, Nuptse, Ama Dablam, Thamserku, and Kantega all visible from the courtyard. The late-afternoon puja ceremony, if your timing aligns, is not something to skip.
Day six continues to Dingboche at 4,410 m via Pangboche. The terrain opens up above the treeline into wide alpine grazing valleys. Views of Ama Dablam dominate the eastern skyline. Day seven is a critical acclimatisation day: the standard hike climbs to the top of Chhukung Ri at 5,546 m — technically the highest point on the entire itinerary. The ascent is non-technical and the views from the top encompass the south face of Lhotse, the Ama Lapcha Pass, and a sweeping panorama of the Imja Valley. This high-altitude day hike primes the body for the passes ahead.
Day eight is a short transfer from Dingboche to Chhukung at 4,730 m. Use the afternoon for rest. The following day is the longest and hardest of the trek.
Pass Day 1 — Kongma La (5,535 m): Chhukung to Lobuche
Rise before dawn. Pack lunch and all water for the day — there are no teahouses between Chhukung and Lobuche. The ascent begins immediately, climbing a series of steep rocky switchbacks above the valley floor. The pass itself is marked by a cairn and prayer flags at 5,535 m. At this altitude, with full overnight acclimatisation at 4,730 m the night before and a warm-up day at 5,546 m behind you, most trekkers handle the altitude reasonably well — though the effort of climbing at elevation is always substantial.
The views from Kongma La are outstanding: the south face of Lhotse towers directly ahead, the Khumbu Glacier sprawls below to the west, and Makalu and Baruntse are visible to the southeast. The descent follows the moraine down to Lobuche at 4,940 m — loose rock and some ice patches in early season. Crampons should be accessible in your daypack. Total day: 8–10 hours. This is the hardest day of the trek.
Days 10–11: Everest Base Camp and Kala Patthar
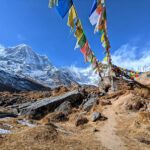
Day ten is the EBC day. From Lobuche the trail crosses the lateral moraine of the Khumbu Glacier to Gorak Shep at 5,164 m, then continues across the glacier’s rocky surface to Everest Base Camp at 5,364 m. In spring the camp is occupied by dozens of expedition teams. The yellow tents, fixed ropes, equipment piles, and sheer logistical scale of a high-altitude expedition are extraordinary to witness at close range. In autumn the camp is quiet — just the glacier and the wind and the West Ridge of Everest above.
Day eleven begins before dawn for the ascent of Kala Patthar at 5,545 m — the classic Everest viewpoint and the highest point on the standard circuit. Sunrise from Kala Patthar, with Everest’s summit pyramid in full view against a pink sky, is one of the great sunrise experiences in the world. After returning to Gorak Shep for breakfast, the trail descends to Dzongla at 4,830 m, positioned below the western approach to Cho La Pass.
Pass Day 2 — Cho La (5,420 m): Dzongla to Gokyo
The second major pass day. The ascent from Dzongla climbs steadily to the base of the pass, then steepens dramatically on a boulder field and glacier section below the summit. The glacier crossing is the defining technical challenge of this trek — ice and snow conditions vary significantly by season, and crampons are strongly recommended regardless of time of year. The path across the glacier requires careful foot placement. An ice axe provides additional security.
From the summit at 5,420 m, the view opens west to the Gokyo Lakes far below — a startling contrast after days in the grey-and-white terrain of the upper Khumbu. The descent into the Gokyo Valley is steep but shorter than the ascent, finishing at the turquoise shore of Dudh Pokhari lake in Gokyo village. The transition from the dry rock of the Lobuche corridor to the vivid glacial blue of the Gokyo Lakes is one of the most dramatic landscape changes in the Khumbu. Total day: 7–9 hours.
Days 13–14: Gokyo — Rest, Lakes, and Gokyo Ri
Day thirteen is a recovery day in Gokyo at 4,790 m. After two major pass crossings in four days, this rest is essential. The Gokyo Lakes — a chain of six sacred glacial lakes — are worth exploring at a gentle pace. The third lake (Dudh Pokhari, directly behind the village) and the fourth and fifth lakes to the north are particularly striking. The Ngozumpa Glacier, Nepal’s longest at approximately 36 km, lines the eastern edge of the valley throughout.
Day fourteen is the Gokyo Ri ascent. Starting early, the 567-metre climb from the village to the summit takes 2–3 hours of steep but non-technical hiking. From the top at 5,357 m, four 8,000-metre peaks are visible at once: Everest, Lhotse, Makalu, and Cho Oyu. Many trekkers who’ve stood on both Kala Patthar and Gokyo Ri consider this the superior panorama — the full north face of Everest is visible here in a way it isn’t from Kala Patthar. Return to Gokyo for an early dinner and sleep. The next day begins early.
Pass Day 3 — Renjo La (5,360 m): Gokyo to Lungden
The final pass crossing, and the most visually rewarding of the three. The trail leaves Gokyo heading northwest, climbing steadily past the fourth and fifth lakes before ascending the final rocky slope to Renjo La at 5,360 m. The ascent is more gradual than the other two passes and the path is better defined — most trekkers, by this point in the trek, find Renjo La physically manageable despite the altitude.
The view from the summit is exceptional. Everest stands directly ahead to the east, Cho Oyu to the north, the Gokyo Lakes glittering below to the southeast, and the Rolwaling Himal spread across the western skyline. It is a 360-degree Himalayan panorama from a summit you’ve earned over three weeks. The descent into the Lungden Valley to the west is long but straightforward, finishing at the small lodge settlement of Lungden at 4,368 m. Total day: 7–8 hours.
Days 16–19: Thame, Namche, and the Return to Lukla
Day sixteen descends from Lungden to Thame at 3,820 m through a quiet, rarely visited valley. Thame is one of the oldest Sherpa settlements in the Khumbu and the home village of Tenzing Norgay, the first person to summit Everest alongside Edmund Hillary in 1953. The village monastery and its surroundings merit an hour of exploration.
Day seventeen is a pleasant half-day walk from Thame back to Namche Bazaar, reconnecting with the main EBC trail. The contrast — busy, familiar Namche after days in remote valleys — is startling and slightly disorienting in a satisfying way. Day eighteen is the long walkout from Namche to Lukla, retracing the approach trail in reverse. Day nineteen is the morning flight back to Kathmandu.
Top Highlights of the Trek
- Three high passes above 5,300 m in a single continuous circuit: Kongma La (5,535 m), Cho La (5,420 m), and Renjo La (5,360 m)
- Everest Base Camp (5,364 m) — the actual base of the world’s highest mountain, with expedition teams in residence during spring season
- Kala Patthar (5,545 m) — the highest point on the circuit, with the closest and most dramatic Everest summit view available without technical climbing
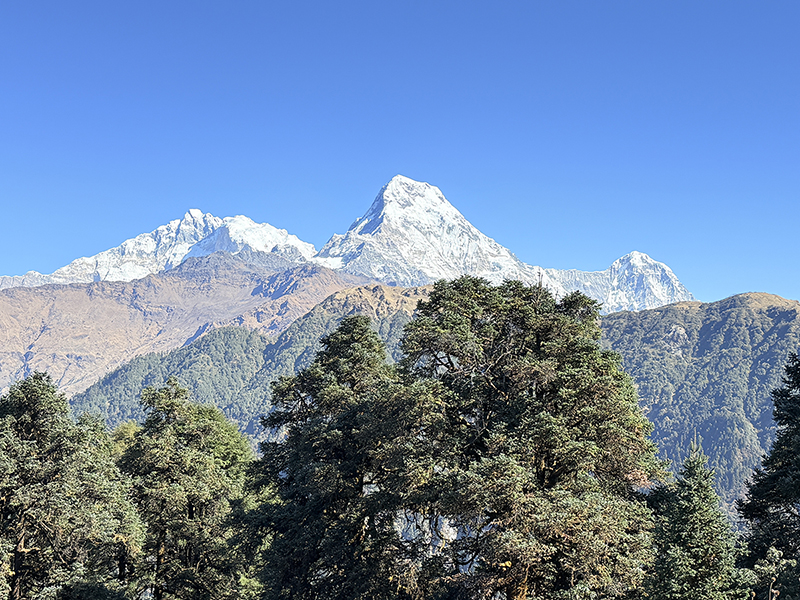
- Gokyo Lakes — six sacred glacial lakes at over 4,700 m, among the most beautiful high-altitude landscapes in Asia
- Gokyo Ri (5,357 m) — panoramic views of four 8,000 m peaks simultaneously: Everest, Lhotse, Makalu, and Cho Oyu
- Tengboche Monastery — the Khumbu’s largest and most historically significant monastery, in an incomparable mountain setting
- Chhukung Ri (5,546 m) — a non-technical acclimatisation peak with views of the south face of Lhotse and the Imja Valley
- Ngozumpa Glacier — Nepal’s longest glacier, tracked for two days along its lateral moraine
- Thame Valley — remote, historic Sherpa village and birthplace of Tenzing Norgay
- Seven points above 5,000 m in a single itinerary — no other standard Nepal trek matches this
Difficulty, Fitness, and Who This Trek Is For
The Everest High Passes Trek is rated strenuous to extreme. This is accurate. It is the most demanding standard (non-technical) trek in the Khumbu region and one of the most demanding in Nepal. These are the specific factors that make it significantly harder than EBC or Gokyo alone.
- Three glacier passes above 5,300 m, each requiring 7–10 hours of hiking on the crossing day
- Multiple nights above 5,000 m including nights at Gorak Shep (5,164 m) and acclimatisation hikes to 5,546 m
- Glacier terrain on Cho La requiring crampons — this is the only major Nepal trek route that routinely requires basic glacier equipment
- 17–21 consecutive days of sustained high-altitude effort with no easy exit option once you are in the remote upper valleys
- Unpredictable weather that can close passes without warning, requiring flexibility and contingency planning
Who it suits: Trekkers who have completed at least one previous multi-day high-altitude trek (Everest Base Camp, Annapurna Circuit, Gokyo, or equivalent) and are comfortable at altitudes above 5,000 m. Trekkers who are physically fit and have trained seriously for 3–6 months prior. Anyone who understands altitude sickness and its management.
Who should not attempt it: First-time trekkers, anyone with unmanaged cardiovascular or respiratory conditions, anyone who has experienced serious AMS on a previous trek without medical clearance, and anyone not willing to hire an experienced licensed guide.
Physical preparation: 3–6 months of dedicated training. Core elements: long hiking days with a loaded pack (20+ km), stair training for sustained ascent simulation, cardiovascular conditioning (running, cycling), and leg strength work. If possible, complete a warm-up trek to 4,000+ m within 6 months before departure.
Permits and Documentation
Three permits are required for this route — more than the Everest View Trek or Gokyo Trek, due to the extended circuit and multiple jurisdiction crossings.
- Sagarmatha National Park Entry Permit — approx. NPR 3,000 (~USD $22). Checked at the park gate south of Namche and again at various points.
- Khumbu Pasang Lhamu Rural Municipality Permit — approx. NPR 2,000 (~USD $15). Required throughout the Khumbu.
- TIMS Card (Trekkers’ Information Management System) — approx. NPR 2,000 (~USD $15). Required for the Thame Valley section of the Renjo La circuit.All permits require a valid passport and two passport-sized photos. Arrange everything in Kathmandu before departure. A licensed trekking operator will handle this. Confirm that all three permits are included in your package cost and collected before the Lukla flight.
Best Time to Go
- October to November (autumn): The optimal window. Post-monsoon skies are clear and sharp, the passes are typically snow-free on the south faces, and conditions on Cho La’s glacier are at their most stable. Book Lukla flights and teahouses well in advance — October is peak season.
- March to May (spring): Also excellent, with rhododendron forests in bloom below 4,000 m. Spring brings warmer temperatures but also the Everest climbing season traffic on the main EBC trail — above Namche it thins out quickly. Late April and May can bring afternoon cloud buildup; morning starts on pass days are essential.
- December to February (winter): Technically possible but not recommended without winter mountaineering experience. Passes can be ice-locked, temperatures at Gorak Shep and Gokyo drop to -20°C or below, and flight disruptions to Lukla are frequent.
- June to September (monsoon): Do not attempt this route during monsoon. Heavy rainfall makes the passes dangerous, visibility on the glacier sections of Cho La drops to near-zero, and the Lukla flight schedule is severely disrupted.
Accommodation
Teahouses cover the full route, though standards drop significantly above Namche and become very basic above 4,500 m.
- Namche Bazaar and Tengboche: Best facilities on the route. Private rooms with attached bathrooms, hot showers, and Wi-Fi available at Namche. Tengboche is simpler but comfortable.
- Dingboche and Chhukung (4,410–4,730 m): Good teahouses with private rooms and communal dining. Cold at night; bring a sleeping bag liner and warm layers for the dining room.
- Lobuche and Gorak Shep (4,940–5,164 m): Basic and cold. Heating is limited. Sleeping bags rated to -15°C are strongly recommended. Electricity for charging is available but unreliable.
- Gokyo (4,790 m): Better than Lobuche in terms of facilities — several lodges of reasonable quality, with lake views and solar-heated common rooms. One of the most pleasant overnight stops on the route despite the altitude.
- Lungden and Thame (3,820–4,368 m): Small and basic. Limited food menu. Thame has better options and is a comfortable descent stop before Namche.
Meals throughout follow the standard high-altitude teahouse menu. Dal bhat (lentil rice with unlimited refills) is the best value at any altitude. Prices roughly double between Namche and Gorak Shep. Bring ample Nepali Rupee cash — the last ATM is in Namche.
How Much Does It Cost?
| Category | Approximate Cost (USD) |
| Budget (independent with local guide hire) | $1,000–$1,500 |
| Mid-range package (operator inclusive, 19 days) | $1,500–$2,200 |
| Fully inclusive / small group operator | $2,200–$3,500 |
| With Island Peak climbing extension (21+ days) | $3,500–$5,000+ |
| Lukla return flights (from Kathmandu) | $220–$350 return |
| All three permits (TIMS + park + municipality) | ~$52 (NPR 7,000 combined) |
| Crampons / ice axe rental (Namche / Kathmandu) | $15–$30 per item (rental) |
| Tipping guide + porter | $12–$17 per day per pair |
Island Peak (Imago Lungma, 6,189 m) is the most popular climbing extension. From Chhukung, a 2-day detour enables a guided summit attempt on a technically accessible 6,000 m peak. This adds significant cost (peak permit ~USD $350 for groups), requires additional climbing equipment, and is suitable only for trekkers with some prior technical climbing experience.
What to Pack
Clothing
- Moisture-wicking base layers, top and bottom — merino wool preferred for sustained multi-day use
- Heavyweight fleece or down mid-layer
- Down jacket rated to -15°C minimum — essential above Namche; critical at Gorak Shep and Gokyo
- Waterproof hard-shell jacket and trousers — wind protection matters as much as rain at altitude
- Trekking trousers — zip-off style impractical above 4,500 m; bring dedicated warm trekking trousers
- Warm hat, expedition-weight gloves and liner gloves, balaclava, neck gaiter
- Waterproof trekking boots — broken in before departure, stiff enough for glacier terrain
- Gaiters — essential for snow and scree sections on the passes
- Camp shoes for teahouse evenings
Technical and Safety Gear
- Crampons — 10 to 12-point crampons compatible with your boots; rental available in Namche and Kathmandu
- Ice axe — strongly recommended for Cho La; rental or purchase in Kathmandu
- Trekking poles — mandatory for this route; the sustained descent terrain makes them essential for knee protection
- Sleeping bag rated to -15°C or colder; supplement with a liner
- Glacier glasses / mountaineering goggles — UV400 certified; glacier glare above 5,000 m is intense
- High-SPF sunscreen (factor 50+) and protective lip balm — reapply every 2 hours at altitude
- 2-litre water capacity; insulated water bottle prevents freezing above 5,000 m
- Water purification tablets and/or a UV Steripen
- Headlamp with spare batteries — dawn starts on pass days require pre-sunrise navigation
- Pulse oximeter — invaluable for monitoring blood oxygen saturation throughout the trek
- Comprehensive personal first aid kit: Ibuprofen, antihistamine, Diamox, blister pads, re-hydration salts, Dioralyte, sterile dressings, and a SAM splint
- Portable power bank, minimum 20,000 mAh — electricity above Namche is scarce and unreliable
Health, Safety, and Altitude Management
Altitude is the central safety consideration on this trek. Seven points above 5,000 m, three glacier pass crossings, and three weeks of sustained effort create compounding physical and physiological demands that must be managed carefully.
Acute Mountain Sickness (AMS)
AMS can affect anyone at altitude regardless of fitness level. Common symptoms: persistent headache, nausea, loss of appetite, fatigue, dizziness, and poor sleep. These are manageable with rest and hydration at the same altitude.
Serious altitude illness — High Altitude Pulmonary Oedema (HAPE) or High Altitude Cerebral Oedema (HACE) — requires immediate descent and emergency medical care. HAPE symptoms include breathlessness at rest and a crackling cough. HACE symptoms include severe headache, loss of coordination, and confusion. Either condition can develop rapidly and becomes life-threatening without descent.
- The absolute rule: if symptoms worsen, descend immediately. Do not wait, do not sleep on it.
- Never ascend with symptoms. Always acclimatise fully before each major altitude gain.
- Drink 3–4 litres of water daily throughout the trek. Dehydration at altitude accelerates AMS.
- Diamox (Acetazolamide) 125–250 mg twice daily aids acclimatisation. Obtain a prescription before travel.
- Carry a pulse oximeter. A reading below 70% SpO2 at altitude, accompanied by symptoms, should be taken seriously.
Glacier Safety on Cho La
The Cho La glacier crossing is the only section of this trek that involves genuine mountaineering terrain. The glacier surface can be hard ice, soft snow, or a mix depending on season and recent weather. Crevasse risk near the pass is low on the standard crossing line but not zero. Your guide will know the safest line for current conditions. Follow their instructions precisely. Do not attempt to cross Cho La independently without crampons and glacier experience.
Weather and Pass Closures
Weather in the upper Khumbu is fast-changing and can be severe. Fresh snowfall can make the passes temporarily impassable. Build contingency days into your itinerary — experienced operators do this automatically. Your guide will make the call on pass conditions on the morning of each crossing. If they say wait, wait.
Insurance and Emergency Evacuation
Comprehensive travel insurance covering high-altitude trekking to 6,000 m and helicopter evacuation is non-negotiable on this route. Evacuation from the upper Khumbu (Gorak Shep, Gokyo, Chhukung) costs USD $4,000–$8,000 without coverage. Emergency contact: Himalayan Rescue Association (HRA) clinic in Namche Bazaar — open during trekking season. Tel: +977-1-4440066. HACE/HAPE is a medical emergency; Gamow bags may be available at some lodges above 4,500 m.
Guide, Porter, and Team
A licensed, experienced guide is mandatory on this trek — not recommended, mandatory. The route crosses remote terrain with multiple nights far from emergency services. A good guide monitors your altitude symptoms, makes route decisions on pass days based on current conditions, handles teahouse logistics, and carries the accumulated knowledge of dozens of previous crossings. Do not cut costs here.
For a party of two trekkers, a team of one guide and one porter is standard. For solo trekkers, some operators recommend two guides for safety on the glacier sections. Porters carry 25–30 kg maximum. Pay above-market wages, ensure your porter has adequate clothing and equipment for the altitude they will reach, and tip generously at the end.
Frequently Asked Questions
Clockwise or anticlockwise — which is better?
Most operators recommend anticlockwise (Kongma La first) for two reasons: it follows the classic EBC acclimatisation profile through Dingboche before the first pass, and it saves Renjo La — the most scenic and least technical pass — for last, when you’re best acclimatised. The clockwise direction (Renjo La first through Thame) is a valid alternative but is considered less ideal for acclimatisation sequencing.
Do I need crampons?
For Cho La: yes, almost certainly. The glacier section below the pass retains ice and hard snow through much of the trekking season. Crampons convert a potentially dangerous scramble into a manageable crossing. For Kongma La and Renjo La: crampons are generally not required in autumn but may be needed in spring and early season if fresh snow has fallen. Carry them from Namche for the full circuit. Rental is available in Namche (approximately NPR 300–500 per day).
What happens if weather closes a pass?
Your guide assesses conditions on the morning of each crossing. If a pass is iced over or there is active weather, they will delay the crossing by a day or reroute. This is why contingency buffer days in the itinerary matter. A good operator builds 1–2 flexible days into the schedule. If you’re flying home on a fixed date with no buffer, you are taking a risk. Budget the extra days.
Can I add Island Peak climbing to this trek?
Yes, and many trekkers do. Island Peak (Imago Lungma, 6,189 m) is a trekking peak accessible from Chhukung with a 2-day detour: one day to base camp (5,087 m) and one summit day. Technical equipment (harness, crampons, ice axe, helmet, fixed rope experience) is required. A peak permit costs approximately USD $350 for groups. This extension adds 2–3 days and typically 20–25% to the total cost. It is one of the best beginner mountaineering peaks in the world and a logical pairing with the Three Passes route.
How does this compare to the Everest Base Camp Trek?
EBC takes 12–16 days, tops out at 5,364 m at base camp and 5,545 m at Kala Patthar, and requires no glacier crossings or technical terrain. The Three Passes route takes 17–21 days, crosses three passes above 5,300 m (including one glacier), visits Gokyo Lakes and Gokyo Ri in addition to EBC and Kala Patthar, and is significantly more demanding throughout. If you’ve done EBC and want the full Khumbu experience, the Three Passes is the natural next step. If you haven’t done EBC, do that first.
Is solo trekking possible?
Technically yes — the trail is well-used and well-marked on the standard EBC sections. However, on the pass crossing days — particularly Cho La’s glacier and Kongma La’s remote moraine — independent navigation without a guide is genuinely risky. Current Nepal trekking regulations also generally require international trekkers to be accompanied by a licensed guide. Hire one.
Final Word
The Everest High Passes Trek is not the most popular trek in Nepal. It is the best one.
It demands more than almost any other non-technical route on earth: three weeks, three glaciated mountain passes, seven points above 5,000 m, and the sustained physical and mental effort of navigating the highest and most remote terrain in the Khumbu. Most trekkers who complete it describe it as the hardest thing they’ve ever done. They also describe it as the thing they’re most proud of.
The circuit delivers everything the Khumbu has to offer in a single, continuous journey — Everest Base Camp, Kala Patthar, Gokyo Lakes, Gokyo Ri, three world-class mountain passes, and a closing loop through valleys most EBC trekkers never see. It’s not a better version of the EBC trek. It’s a fundamentally different category of experience.
Prepare seriously. Hire an excellent guide. Build buffer days. Go in autumn or spring. And allow yourself to be completely absorbed by one of the great mountain adventures on this planet.
Recent Posts